Thank you guys !
I checked my cheapskates last night seemed ok but I retightened everything to make sure everything is seated without movement.
Recalibrated again from the beginning to PID Autotune printed again, same results
I then increased the Infil to 50% instead of the 20% it was a tad better
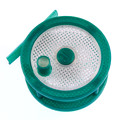
The beginning looks great, first few layers going down well but always ends up ratty.
The middle item has a sunken line around the edge and around the middle circle but the far right object should be perfectly flat and smooth.
Using Repetier-Host Mac 0.53
Here is the G Code to see my settings. I've messed with a few things each print but get the same results.
Note i'm using the fine Nozzle .368 size
I'm including the .stl file of this a free file if anyone can see anything in it that needs specific settings. I scaled it to 50 as it's really small
I used this one as less plastic is needed.
; generated by Slic3r 0.9.8 on 2013-02-11 at 13:14:10
; layer_height = 0.2
; perimeters = 3
; top_solid_layers = 3
; bottom_solid_layers = 3
; fill_density = 0.5
; perimeter_speed = 30
; infill_speed = 30
; travel_speed = 200
; scale = 1
; nozzle_diameter = .368
; filament_diameter = 1.9
; extrusion_multiplier = 0.9
; perimeters extrusion width = 0.57mm
; infill extrusion width = 0.57mm
; support material extrusion width = 0.57mm
; first layer extrusion width = 0.39mm
M107
M190 S65 ; wait for bed temperature to be reached
M104 S210 ; set temperature
G28
G1 Z300 F7500
M109 S210 ; wait for temperature to be reached
G90 ; use absolute coordinates
G21 ; set units to millimeters
G92 E0
M82 ; use absolute distances for extrusion
G1 F3300.000 E-2.00000
G92 E0