[img]https://lh3.googleusercontent.com/-M-NK ... CN9511.JPG[/img]
texSC - Rostock MAX
Re: texSC - Rostock MAX
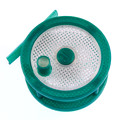
My first print after adjusting the extruder steps per mm... NICE!! 
[img]https://lh3.googleusercontent.com/-M-NK ... CN9511.JPG[/img]
[img]https://lh3.googleusercontent.com/-M-NK ... CN9511.JPG[/img]
DIY instructions/videos/hardware links:
Carbon fiber rods w/ ball joints for Rostock MAX ~$40 http://forum.seemecnc.com/viewtopic.php?f=36&t=2165
Carbon fiber rods w/ ball joints for Rostock MAX ~$40 http://forum.seemecnc.com/viewtopic.php?f=36&t=2165
Re: texSC - Rostock MAX
And my 2nd print., the infill is looking SWEET! I was practically jumping up & down when I saw how well it was printing...
[img]https://lh3.googleusercontent.com/-bydc ... CN9520.JPG[/img]
Unfortunately though it looks like it's stringing between the four corner towers
[img]https://lh3.googleusercontent.com/-PEhB ... CN9523.JPG[/img]
But over all I think it's leaps & bounds over what I had
[img]https://lh6.googleusercontent.com/-p-Zs ... CN9524.JPG[/img]
[img]https://lh4.googleusercontent.com/-D_ce ... CN9525.JPG[/img]
[img]https://lh6.googleusercontent.com/-VMBC ... CN9531.JPG[/img]
[img]https://lh4.googleusercontent.com/-GOdK ... CN9533.JPG[/img]
DIY instructions/videos/hardware links:
Carbon fiber rods w/ ball joints for Rostock MAX ~$40 http://forum.seemecnc.com/viewtopic.php?f=36&t=2165
Carbon fiber rods w/ ball joints for Rostock MAX ~$40 http://forum.seemecnc.com/viewtopic.php?f=36&t=2165
Re: texSC - Rostock MAX
Tried to do a more complicated print with overhangs... It went pretty well until it got to the overhangs, lol
[img]https://lh6.googleusercontent.com/-fB2K ... CN9539.JPG[/img]
[img]https://lh4.googleusercontent.com/-Bmuw ... CN9540.JPG[/img]
Once it got to the overhangs it kept "bumping" into the extra plastic and eventually knocked it off of it's spot on the build plate & I had to kill the job
Here it is a little more cleaned up from the extra plastic
[img]https://lh3.googleusercontent.com/-Ex8v ... CN9542.JPG[/img]
[img]https://lh4.googleusercontent.com/-QNYW ... CN9547.JPG[/img]
[img]https://lh6.googleusercontent.com/-l5ex ... CN9548.JPG[/img]
[img]https://lh6.googleusercontent.com/-byyL ... CN9549.JPG[/img]
And my first uploaded video:
[youtube]http://www.youtube.com/watch?v=KVQKSfyDSYM[/youtube]
Last edited by texsc98 on Thu Feb 21, 2013 11:54 am, edited 2 times in total.
DIY instructions/videos/hardware links:
Carbon fiber rods w/ ball joints for Rostock MAX ~$40 http://forum.seemecnc.com/viewtopic.php?f=36&t=2165
Carbon fiber rods w/ ball joints for Rostock MAX ~$40 http://forum.seemecnc.com/viewtopic.php?f=36&t=2165
Re: texSC - Rostock MAX
That bumping is why I started using the Z Lift parameter is slic3r. I now do a 1mm Z Lift and that gets the nozzle out of the way enough to clear the part. This new nozzle has a much larger radius down at the tip, which I think increases the likelihood of snags.
Sublime Layers - my blog on Musings and Experiments in 3D Printing Technology and Art
Start Here:
A Strategy for Successful (and Great) Prints
Strategies for Resolving Print Artifacts
The Eclectic Angler
Re: texSC - Rostock MAX
Ok good to know, I'll have to try that... I had tried 3mm lifts like you were a while back, but it was lifting the part off the bed for some reason. I'll have to try it again now with all the calibration work I've done maybe it'll work like it's supposed to nowmhackney wrote:That bumping is why I started using the Z Lift parameter is slic3r. I now do a 1mm Z Lift and that gets the nozzle out of the way enough to clear the part. This new nozzle has a much larger radius down at the tip, which I think increases the likelihood of snags.
DIY instructions/videos/hardware links:
Carbon fiber rods w/ ball joints for Rostock MAX ~$40 http://forum.seemecnc.com/viewtopic.php?f=36&t=2165
Carbon fiber rods w/ ball joints for Rostock MAX ~$40 http://forum.seemecnc.com/viewtopic.php?f=36&t=2165
Re: texSC - Rostock MAX
If anyone is having issues with their first layer sticking I may have a helpful tip... If you're using Slic3r, in the "Print Settings" tab under "Advanced" on the left side I'm setting:
"Default extrusion width" to 0.5
"First Layer" to 1
"Perimeters" to 0 (uses default)
"Infill" to 0 (uses default)
"Support material" to 0 (uses default)
Setting the first layer to twice that of the default layer basically "smushes" the plastic down onto the build plate flattening it out so it has better adhesion. You might could just say 200% for "First Layer", but I remember in a post polygonhell saying the manually set the extrusion width to your nozzle size so that's how I did it. I'll post a picture of my setting page later, my laptop is acting up right now & won't let me save a screenshot, lol
DIY instructions/videos/hardware links:
Carbon fiber rods w/ ball joints for Rostock MAX ~$40 http://forum.seemecnc.com/viewtopic.php?f=36&t=2165
Carbon fiber rods w/ ball joints for Rostock MAX ~$40 http://forum.seemecnc.com/viewtopic.php?f=36&t=2165
Re: texSC - Rostock MAX
Using the z-lift at 1mm like mhackney suggested seems to have helped, thanks! With this next print I think I was being a little too ambitious, considering I'm still not "fully" calibrated... But it actually turned out ok. I printed Serge's head: http://www.thingiverse.com/thing:49690 from thingiverse just to see if it would do it. I didn't use support material, and printed *really* slow, like <10mm/sec, and at 255*C. I think it took about 3 hours to print, and I only printed it at 40% scale, lol.
About 60% the way through the print I accidentally knocked the laptop off the desk & killed the job. I imported the stl into sketchup, then sliced the head down to start at about where I thought it had left off. Re-imported it into repetier-host & had to do quite a few dry runs until I thought it was close to the correct size when trying to re-start the print. The bed had cooled down as well and the piece was no longer sticking... So I also had to make sure the rotation & placement on x/y was correct. After a lot of tweaking, I had it close enough and re-started it. It was the correct proportions I believe, but I did have it slightly misaligned on the y-axis. Here's some pics:
[img]https://lh4.googleusercontent.com/-t3nJ ... CN9559.JPG[/img]
[img]https://lh3.googleusercontent.com/-DcE5 ... CN9560.JPG[/img]
You can see here it had issues with the chin overhang, I thought it was going to do worse than it actually did though...
[img]https://lh4.googleusercontent.com/-D_t3 ... CN9561.JPG[/img]
And the beginning of the nose overhang suffered the same issue:
[img]https://lh4.googleusercontent.com/-1h7_ ... CN9563.JPG[/img]
Here you can see the line of where I had to piece together re-starting the print right where the eyes are
[img]https://lh3.googleusercontent.com/-mScy ... CN9566.JPG[/img]
[img]https://lh4.googleusercontent.com/--QYa ... CN9569.JPG[/img]
Finished!
[img]https://lh3.googleusercontent.com/-gHAW ... CN9573.JPG[/img]
DIY instructions/videos/hardware links:
Carbon fiber rods w/ ball joints for Rostock MAX ~$40 http://forum.seemecnc.com/viewtopic.php?f=36&t=2165
Carbon fiber rods w/ ball joints for Rostock MAX ~$40 http://forum.seemecnc.com/viewtopic.php?f=36&t=2165
Re: texSC - Rostock MAX
So after reading Polygonhell's post http://forum.seemecnc.com/viewtopic.php ... idth#p5452 I decided to go through these steps to see if my extrusion width was where it should be.... And of course it wasn't. I was over-extruding by a fair amount. I'm using the .5mm nozzle, and extrusion width set to .55. My first thin wall cube came out at .63. So in slic3r I modified my extrusion multiplier to .87 and printed again. This time I came up with an average width of .42. So one more adjustment of the extrusion multiplier to .93 and I came up with a .57mm print which I'm happy with. Not perfect, but at least closer!
[img]https://lh4.googleusercontent.com/-gbKc ... CN9610.JPG[/img]
I still need to go through some steps to determine my optimal temperature range for printing... I've just guesstimated based on how it looks while printing. I'm currently doing first layer at 260, and other layers at 255. I know this sounds crazy hot, but it seems to work ok for now.
DIY instructions/videos/hardware links:
Carbon fiber rods w/ ball joints for Rostock MAX ~$40 http://forum.seemecnc.com/viewtopic.php?f=36&t=2165
Carbon fiber rods w/ ball joints for Rostock MAX ~$40 http://forum.seemecnc.com/viewtopic.php?f=36&t=2165
Re: texSC - Rostock MAX
So after getting my extrusion with close I decided to see if I was printing properly to size... So I made a quick test block in openSCAD (http://www.thingiverse.com/thing:55887) of 100mm and printed it... Pretty darn close!!
[img]https://lh4.googleusercontent.com/-vESy ... CN9589.JPG[/img]
[img]https://lh4.googleusercontent.com/-vESy ... CN9589.JPG[/img]
DIY instructions/videos/hardware links:
Carbon fiber rods w/ ball joints for Rostock MAX ~$40 http://forum.seemecnc.com/viewtopic.php?f=36&t=2165
Carbon fiber rods w/ ball joints for Rostock MAX ~$40 http://forum.seemecnc.com/viewtopic.php?f=36&t=2165
Re: texSC - Rostock MAX
I decided to go brave again like with the Serge head I printed and print this keep from thingiverse http://www.thingiverse.com/thing:30463. I love how the base layers were printing, I was running it at 200% feedrate and it way laying down the plastic smooth as butter without infill issues!
[img]https://lh6.googleusercontent.com/-znoI ... CN9598.JPG[/img]
After the first 4 layers were layed down, I reduced the feed rate to 60% then went and watched some TV occasionally checking on it. I took some video I'll post in a bit, but here's some photos I have without any touchup
[img]https://lh6.googleusercontent.com/-9wHQ ... CN9602.JPG[/img]
[img]https://lh6.googleusercontent.com/-hfdy ... CN9604.JPG[/img]
[img]https://lh4.googleusercontent.com/-Alq2 ... CN9605.JPG[/img]
[img]https://lh6.googleusercontent.com/-oiHK ... CN9607.JPG[/img]
DIY instructions/videos/hardware links:
Carbon fiber rods w/ ball joints for Rostock MAX ~$40 http://forum.seemecnc.com/viewtopic.php?f=36&t=2165
Carbon fiber rods w/ ball joints for Rostock MAX ~$40 http://forum.seemecnc.com/viewtopic.php?f=36&t=2165