Ok, I built my first RostockMAX about a year ago - almost to the day. I was relatively new to 3D printing when I got it, but thru much MUCH trial and error and the help of you guys here I was able to get it printing "ok". Since I was never able to print great, I shoved it in the corner and it didn't get used much.
Recently I've seen some videos of the Ultimaker 2 and some of the amazing prints it does out of the box and it got me excited about 3D printing again. So yesterday I dug out my RostockMAX, set it up again and noticed the firmware had been updated as has all of the software. So I figured I'd start re-calibrating from scratch.
So I downloaded and configured John's 0.91 repetier firmware and started going thru the calibration steps I found http://robertshady.com/content/beginner ... eemecnccom.
I did step 1 - Calibrated my towers. Got them all 100% identical.
I did step 2 - But the value I had to enter for my Delta Radius line was HUGE and then I noticed that even though it tracks nicely to the Z tower, it still has a small gap near the X & Y tower. My Delta Radius line looks like this:
#define DELTA_RADIUS (PRINTER_RADIUS-END_EFFECTOR_HORIZONTAL_OFFSET-CARRIAGE_HORIZONTAL_OFFSET+17.9)
But to be off by 17.9 seems alot, my old value was 0.00
Another thing that seems off is that for the extruder steps I have 584 from my old configuration, but the new configuration had 92.4? Seems like a big difference.
Finally, something else I saw that seemed very strange is X/Y/Z_MAX_LENGTH in the configuration was set to 250/250/234.66 and my actual Z travel according to the LCD is 477.6 - again, seems like a HUGE discrepancy.
Also, I see these:
/** \brief column positions - change only to correct build imperfections! */
#define DELTA_ALPHA_A 210
#define DELTA_ALPHA_B 330
#define DELTA_ALPHA_C 90
/** Correct radius by this value for each column. Perfect builds have 0 everywhere. */
#define DELTA_RADIUS_CORRECTION_A 0
#define DELTA_RADIUS_CORRECTION_B 0
#define DELTA_RADIUS_CORRECTION_C 0
And I've looked at the ASCII diagram, but I still don't quite understand what they are used for. Clearly I have build imperfections, but I have no idea where.
So... In the end, it is printing again, and I am getting "ok" results (probably close to what I was before), but I'd really like to get this nailed down. I'd actually use it, and maybe even buy another if I could get some decent prints.
Thanks in advance!
Re-Calibrating RostockMAX and it seems WAY off?!?
Re: Re-Calibrating RostockMAX and it seems WAY off?!?
Judging by your extruded steps, you have an early rostock with a geared extruded, that's why there is such a big difference in steps. I'm not real familiar with the early rostock, there have been many improvements made. You may also have different pulleys as well. You may want to think about upgrading your extruder and pulleys so you are up to date so it will be easier for us to help you dial things in..
http://www.youtube.com/user/aonemarine" onclick="window.open(this.href);return false;
Lost pla castings? see me
Lost pla castings? see me
Re: Re-Calibrating RostockMAX and it seems WAY off?!?
If your machine has a RAMBo v1.0, you'll need to make sure you're using 8 micro steps. v1.1 and newer can use 16.
The website you link is in error - the first edition of the build manual was out before he wrote that blog entry. I know. I wrote it.
I'd recommend you download the first edition build manual as linked in the Official Docs sub-board.
The calibration information in all three sources are incorrect for the .91 firmware. I would recommend that you grab the .91 firmware again and only change the values regarding micro stepping (if you've got a v1.0 RAMBo) and steps per mm for the extruder and drive gears. (I'm assuming you've got the original machined drive gears and a Steve's Extruder.)
I'll be writing up a calibration supplement for the .91 firmware this week.
g.
Delta Power!
Defeat the Cartesian Agenda!
http://www.f15sim.com - 80-0007, The only one of its kind.
http://geneb.simpits.org - Technical and Simulator Projects
Defeat the Cartesian Agenda!
http://www.f15sim.com - 80-0007, The only one of its kind.
http://geneb.simpits.org - Technical and Simulator Projects
Re: Re-Calibrating RostockMAX and it seems WAY off?!?
Perhaps there was some confusion as to who you were, I see:geneb wrote:If your machine has a RAMBo v1.0, you'll need to make sure you're using 8 micro steps. v1.1 and newer can use 16.
The website you link is in error - the first edition of the build manual was out before he wrote that blog entry. I know. I wrote it.
I'd recommend you download the first edition build manual as linked in the Official Docs sub-board.
The calibration information in all three sources are incorrect for the .91 firmware. I would recommend that you grab the .91 firmware again and only change the values regarding micro stepping (if you've got a v1.0 RAMBo) and steps per mm for the extruder and drive gears. (I'm assuming you've got the original machined drive gears and a Steve's Extruder.)
I'll be writing up a calibration supplement for the .91 firmware this week.
g.
"A forum user (geneb?) has created a fairly nice assembly manual (out of the goodness of his heart) and between the video, the manual, and the message forums you should be able to work your way thru the build process (NOTE: I have heard that he is in the process of updating the assembly manual, so hopefully that will reduce some of the inconsistencies)."
So you received credit for your assembly manual in the same sentence. I seemed to have gotten a frankenstein of various different RostockMAX because my stuff was different than what was in your assembly manual even. I do have a RAMBO 1.1. I do have metal gears on my stepper motors. But I have black rollers on my cheapskates instead of white, and I have aluminum cams instead of plastic. I do have a bunch of holes in the top board (is that for the EZ struder that wasn't out yet?). And I do have Steve's Extruders.
As far as configuration goes, what I changed was:
EXT0_STEPS_PER_MM from 92.4 (EzStruder) to 584 (Steve's Extruder)
X_MAX_LENGTH from 250 to 477.52
Y_MAX_LENGTH from 250 to 477.52
Z_MAX_LENGTH from 250 to 477.52
DELTA_RADIUS (added 17.9 to help keep the head level across the build platform)
Everything else is stock. Before I added the 17.9 to the DELTA_RADIUS I had to jog the head down 12.9 steps on the outer edges to get it to touch over where it touched in the center. I changed the MAX_LENGTH's because my Z Height as reported by the firmware was 477.52 (I lowed the head close to the platform, used the LCD control to manually lower it until it touched, reset the Z, home'd and went back into the Z setting and it said 477.52. I put that number in my software and now when I tell it to G1 X0 Y0 Z0 it goes down to the platform perfectly).
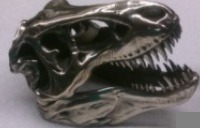
This is the kind of print I am getting currently...
[img]http://s29.postimg.org/cf1pig2d3/2014_02_12_10_37_50.jpg[/img]
Re: Re-Calibrating RostockMAX and it seems WAY off?!?
Yeah, my skim reading never has been that great. *facepalm*
The MAX_LENGTH fields are wrong for sure unless you've got a taller than standard machine. When you set the Z zero point through the LCD menu, it's going to change the Z_MAX_LENGTH to the actual height of the Z axis (which out of the three is the important one in this instance).
I would recommend you undo your changes to DELTA_RADIUS and re-trammel the effector platform by making adjustments to the Horizontal Radius parameter in the EEPROM. It does the same thing and will allow you to calibrate the machine without having to recompile/re-upload the firmware for each iteration.
I'm working on a supplemental calibration guide that covers the .91 firmware. When that is done, it'll go into the manual as an appendix with a pointer to it.
You should follow the flowchart in the second edition for doing the calibration as it's the most clear.
g.
Delta Power!
Defeat the Cartesian Agenda!
http://www.f15sim.com - 80-0007, The only one of its kind.
http://geneb.simpits.org - Technical and Simulator Projects
Defeat the Cartesian Agenda!
http://www.f15sim.com - 80-0007, The only one of its kind.
http://geneb.simpits.org - Technical and Simulator Projects
Re: Re-Calibrating RostockMAX and it seems WAY off?!?
Can you count and see how many teeth on your pulleys?? 20 tooth or 15
20/15. 1.33
477/365. 1.3
Kinda looks like its the pulley teeth number being off to give you the 477 z height...??
Also your xyz max length was set to 250 in the firmware?? That looks like its for the Orion?? Xyz max on the rostock is like 367..... ???
Am I thinking right here guys? Or have I been breathing too many abs fumes?
http://www.youtube.com/user/aonemarine" onclick="window.open(this.href);return false;
Lost pla castings? see me
Lost pla castings? see me
Re: Re-Calibrating RostockMAX and it seems WAY off?!?
DavidF, the EEPROM defaults in the 0.91 firmware are 250mm. This is ok for our purposes as the first step you take to calibrate the machine is to set the correct Z height. Check out Appendix C in the update to the manual I uploaded yesterday.
g.
g.
Delta Power!
Defeat the Cartesian Agenda!
http://www.f15sim.com - 80-0007, The only one of its kind.
http://geneb.simpits.org - Technical and Simulator Projects
Defeat the Cartesian Agenda!
http://www.f15sim.com - 80-0007, The only one of its kind.
http://geneb.simpits.org - Technical and Simulator Projects
Re: Re-Calibrating RostockMAX and it seems WAY off?!?
speculate, then take your best guess, try and err,guess agan, try and err and when all else fails RTFnM! 
LOL I see now....
LOL I see now....
http://www.youtube.com/user/aonemarine" onclick="window.open(this.href);return false;
Lost pla castings? see me
Lost pla castings? see me
Re: Re-Calibrating RostockMAX and it seems WAY off?!?
hehe
g.
g.
Delta Power!
Defeat the Cartesian Agenda!
http://www.f15sim.com - 80-0007, The only one of its kind.
http://geneb.simpits.org - Technical and Simulator Projects
Defeat the Cartesian Agenda!
http://www.f15sim.com - 80-0007, The only one of its kind.
http://geneb.simpits.org - Technical and Simulator Projects
Re: Re-Calibrating RostockMAX and it seems WAY off?!?
Gene,geneb wrote:DavidF, the EEPROM defaults in the 0.91 firmware are 250mm. This is ok for our purposes as the first step you take to calibrate the machine is to set the correct Z height. Check out Appendix C in the update to the manual I uploaded yesterday.
g.
Thanks for the update. I'm just letting you know I'm going thru your new manual and making sure all of my measurements are correct, and that everything is square and tight. I noticed that a couple of the bolts had come loose over time. I can also see that my towers aren't perfectly square from side to side, but that are square from out to in (not sure how that happened).
Hopefully I'll make it thru redoing the top part of the machine tonight, recalibrate it and we'll see how it goes from there. I have a feeling that some of my problems may be due to using some cheap PLA as well, during my measurements I noticed that my PLA varied from 1.62 - 1.80 within a few feet.
I also plan to go back to the stock firmware as you suggested, only changing the steps for the extruder to 584.
I'll let you know once I get things working again. Thanks!
Re: Re-Calibrating RostockMAX and it seems WAY off?!?
You'll also need to tweak the steps per mm for the axis steppers if you've got the original machined belt drive gears. I don't recall what that figure is, but it should be listed in the first edition of the manual.
g.
g.
Delta Power!
Defeat the Cartesian Agenda!
http://www.f15sim.com - 80-0007, The only one of its kind.
http://geneb.simpits.org - Technical and Simulator Projects
Defeat the Cartesian Agenda!
http://www.f15sim.com - 80-0007, The only one of its kind.
http://geneb.simpits.org - Technical and Simulator Projects
Re: Re-Calibrating RostockMAX and it seems WAY off?!?
Sorry, I've been playing.. 
So I basically rebuilt the entire top part of my RostockMAX taking care to make sure everything was square, the same height, and nice and tight.
I then followed your new updated assembly manual,
Chapter 17 - Software Installation & Configuration
Chapter 18 - Calibrating your RostockMAX
Appendix C - Revised Calibration Instructions
Chapter 19 - Your first print.
I have to say, it turned out okay. After switching to KisSlicr and tweaking some parameters, I'm getting the best prints I think I have ever gotten. I think I may have a tiny bit of play in my Delta Arms, but it looks like SeeMeCNC bumped up their prices significantly on alot of spare parts, so I'm going to try to live with it for now.
Are they perfect? No... Which brings me to my next question.
I know a year ago a bunch of us on here were trying to get a visual guide to tweaking your 3D printer written, something that basically says if your print looks like this, then you want to try bumping your Prime & Suck up by 2mm, if it looks like this you should do blank...
Did that ever happen? I am having some minor issues here and there and I just have no clue as to why they might be happening (like my bridges aren't nice and clean for one).
Any help is greatly appreciated!