Default Rostock
-
Generic Default

- Printmaster!
- Posts: 554
- Joined: Mon Jun 03, 2013 6:56 pm
- Contact:
Re: Default Rostock
The stepper wiring is definitely in the right order. I get different results every time I open the electronics door, even if I don't change anything. So I think this might go back to the off/on switch having loose pins, or it could be the 4 pin connector sockets that are loose between the plugs and the rambo board. I'll try sticking tape on the bottom half to act like a shim; that should prevent them from wobbling so much.
Check out the Tri hotend!
Re: Default Rostock
show me a pic of your connectors / crimps something isn't right here.Generic Default wrote:The stepper wiring is definitely in the right order. I get different results every time I open the electronics door, even if I don't change anything. So I think this might go back to the off/on switch having loose pins, or it could be the 4 pin connector sockets that are loose between the plugs and the rambo board. I'll try sticking tape on the bottom half to act like a shim; that should prevent them from wobbling so much.
My rostock build log http://forum.seemecnc.com/viewtopic.php?f=42&t=1228
-
Generic Default
- Printmaster!
- Posts: 554
- Joined: Mon Jun 03, 2013 6:56 pm
- Contact:
Re: Default Rostock
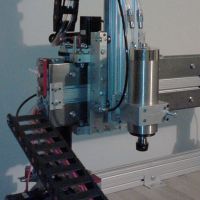
from that second pic i can tell you thats your problem. your pins aren't crimped properly not allowing you to push them all the way in, doesn't even look like the locking tab is in the hole either.
you might want to get a new set of pins and recrimp them with a better tool. it should look like the photo i posted. I believe you may also be shorting some of those pins together, with them not being all the way in, they could come out and short (causing other problems)
also if your using blue tape to splice your wiring, its just a matter of time till something comes apart.
do it right the first time (or in your case the next time) and you might not have some of these issues.
pins are all the way in, locking tab protruding into locking hole
you might want to get a new set of pins and recrimp them with a better tool. it should look like the photo i posted. I believe you may also be shorting some of those pins together, with them not being all the way in, they could come out and short (causing other problems)
also if your using blue tape to splice your wiring, its just a matter of time till something comes apart.
do it right the first time (or in your case the next time) and you might not have some of these issues.
Last edited by cambo3d on Thu Jun 06, 2013 10:47 pm, edited 7 times in total.
My rostock build log http://forum.seemecnc.com/viewtopic.php?f=42&t=1228
Re: Default Rostock
I had a flaky on/off switch when I first assembled the machine. It would actually start up and then cut off after a while. I thought I had a bad power supply. I talked with Steve at Seemecnc and it turns out the insides of the switch are sensitive to overheating when you solder the wires to them. I replaced the on/off switch with a beefier one and have had no problems since. I don't know if they have updated the switch since then (March).
Last edited by Broose on Thu Jun 06, 2013 10:26 pm, edited 2 times in total.
Re: Default Rostock
Broose wrote:I had a flaky on/off switch when I first assembled the machine. I thought I had a bad power supply. I talked with Steve at Seemecnc and it turns out the insides are sensitive to overheating when you solder the wires to them. I replaced the on/off switch with a beefier one and have had no problems since.
if you do it right, you shouldn't overheat the switch.
My rostock build log http://forum.seemecnc.com/viewtopic.php?f=42&t=1228
Re: Default Rostock
I'm not saying I did it correctly! I probably used a Weller soldering gun which has way too much power because my iron was out of commission at the time.cambo3d wrote:Broose wrote:I had a flaky on/off switch when I first assembled the machine. I thought I had a bad power supply. I talked with Steve at Seemecnc and it turns out the insides are sensitive to overheating when you solder the wires to them. I replaced the on/off switch with a beefier one and have had no problems since.
if you do it right, you shouldn't overheat the switch.
-
Generic Default
- Printmaster!
- Posts: 554
- Joined: Mon Jun 03, 2013 6:56 pm
- Contact:
Re: Default Rostock
I think I had that same problem with my switch. There is really no decent way to solder the wires to it without melting the plastic that the pin is stuck in, and then it starts sliding around in it. I might just get some alligator clips and hang them out of my electronics door as an easy way to turn it on or off. Or maybe I'll just solder the two wires directly together and use the power supply switch instead.
As for crimp connectors, I only have 10 of them left on that little sheet-belt thing. That's not enough to redo all four steppers, and I can't figure out how to actually hook the little crimp-side-piece-thingies around the wire. Mine are just smashed together, which apparently won't let them fit into the 4 pin connectors. I thought that was how it was supposed to be!
So, are there any ways to get around this? Are there any stores that sell crimps locally, and how much do they cost? I still don't know what gauge of wire the stepper wires are, or what size of crimps to use.
Thanks!
Check out the Tri hotend!
Re: Default Rostock
Generic Default wrote:I think I had that same problem with my switch. There is really no decent way to solder the wires to it without melting the plastic that the pin is stuck in, and then it starts sliding around in it. I might just get some alligator clips and hang them out of my electronics door as an easy way to turn it on or off. Or maybe I'll just solder the two wires directly together and use the power supply switch instead.
As for crimp connectors, I only have 10 of them left on that little sheet-belt thing. That's not enough to redo all four steppers, and I can't figure out how to actually hook the little crimp-side-piece-thingies around the wire. Mine are just smashed together, which apparently won't let them fit into the 4 pin connectors. I thought that was how it was supposed to be!
So, are there any ways to get around this? Are there any stores that sell crimps locally, and how much do they cost? I still don't know what gauge of wire the stepper wires are, or what size of crimps to use.
Thanks!
you can get a beefier switch that wont be prone to heat damage from radio shack.
For the pins, ultimaker.com sells replacement pins or you can get them from mouser.
the part numbers to the pins from mouser are 538-16-02-0102 for the 22-24 gauge pins/wires and 538-16-02-0096 for the 24-30 gauge pins/wires. there cheap I keep a lot full handy for mods. They probably sell the correct crimper or a universal one, which is what i used. if you look up the part number it should tell you what crimper to use on the website. i believe genes new manual also list one.
My rostock build log http://forum.seemecnc.com/viewtopic.php?f=42&t=1228
Re: Default Rostock
Here's a thread with photos on how to crimp with needle nose pliers, or better, you can get a crimper
http://forum.seemecnc.com/viewtopic.php ... mps#p12194
I didn't trust my crimping capabilities with pliers so I also soldered the connections a little after crimping, making sure it wasn't so much solder that the crimp wouldn't fit into the connector
http://forum.seemecnc.com/viewtopic.php ... mps#p12194
I didn't trust my crimping capabilities with pliers so I also soldered the connections a little after crimping, making sure it wasn't so much solder that the crimp wouldn't fit into the connector
-
Generic Default
- Printmaster!
- Posts: 554
- Joined: Mon Jun 03, 2013 6:56 pm
- Contact:
Re: Default Rostock
Wait, both ultimachine and mouser are online stores. I didn't really think the crimps would be that big of a deal, but will I seriously have to wait a week or two and spend like 15 dollars for a few tiny sheet metal crimps? Are there any stores that sell them locally, any workarounds, or any way that I can avoid such a long delay + shipping costs?
Check out the Tri hotend!
Re: Default Rostock
Generic Default wrote:Wait, both ultimachine and mouser are online stores. I didn't really think the crimps would be that big of a deal, but will I seriously have to wait a week or two and spend like 15 dollars for a few tiny sheet metal crimps? Are there any stores that sell them locally, any workarounds, or any way that I can avoid such a long delay + shipping costs?
there's really no workaround, unless you can find something similar at your local electronics shop. Wiring is not a step that should be skimped on. its important to do it right, or bad things happen.
My rostock build log http://forum.seemecnc.com/viewtopic.php?f=42&t=1228
-
Polygonhell
- ULTIMATE 3D JEDI
- Posts: 2417
- Joined: Mon Mar 26, 2012 1:44 pm
- Location: Redmond WA
Re: Default Rostock
I doubt you'll find them locally, the last set I bought I got from pololu, took about 3 or 4 days to get them.
Printer blog http://3dprinterhell.blogspot.com/
-
Generic Default
- Printmaster!
- Posts: 554
- Joined: Mon Jun 03, 2013 6:56 pm
- Contact:
Re: Default Rostock
Thanks for helping me through this guys. I just spent the last 3 hours un-crimping, crimp-fixing, and re-crimping every single bad crimp I made. So now they're correctly done and all four motors are spinning smoothly and quietly.
I also just extruded my first 10mm of nylon! Which is a big relief after 6 days of building and fixing.
Everything seems to be working fine, except all three axises are inverted and I can't seem to change it by uploading the firmware with the inverted stuff. In arduino, there are the tabs at the top for all of the files that get opened when I open the Repetier.ino file. I changed the invert part from true to false, but when I compiled and uploaded, it didn't change anything. Arduino prints this at the bottom after I compile and upload;
Binary sketch size: 101,612 bytes (of a 258,048 byte maximum)
avrdude: stk500v2_ReceiveMessage(): timeout
avrdude: stk500v2_ReceiveMessage(): timeout
avrdude: stk500v2_ReceiveMessage(): timeout
avrdude: stk500v2_ReceiveMessage(): timeout
avrdude: stk500v2_ReceiveMessage(): timeout
avrdude: stk500v2_ReceiveMessage(): timeout
avrdude: stk500v2_getsync(): timeout communicating with programmer
Check out the Tri hotend!
-
Generic Default
- Printmaster!
- Posts: 554
- Joined: Mon Jun 03, 2013 6:56 pm
- Contact:
Re: Default Rostock
I couldn't figure out why arduino wasn't loading, so I just manually switched the stepper wires to invert the axises.
I have completed the entire calibration section of the manual and I've printed a few models so far. My calipers are showing that the tolerances of a 0.375 inch cube are as low as +- 0.001, which is pretty good. Slicer hasn't worked for me until now, so I used Cura for everything so far.
The problem I'm facing now is that my Z is zeroed for the middle of the bed, but if I move towards any of the axises it lifts up a millimeter or two. What could be causing this problem? I spent a lot of time adjusting each arm plate end stop screw, but that didn't help at all.
Once I get some decent prints with moving parts and stuff, I'll start posting videos and pictures.
Thanks!
Check out the Tri hotend!
-
Polygonhell
- ULTIMATE 3D JEDI
- Posts: 2417
- Joined: Mon Mar 26, 2012 1:44 pm
- Location: Redmond WA
Re: Default Rostock
Domed motion normally requires a change to DELTA_RADIUS in the firmware
Printer blog http://3dprinterhell.blogspot.com/
-
Generic Default
- Printmaster!
- Posts: 554
- Joined: Mon Jun 03, 2013 6:56 pm
- Contact:
Re: Default Rostock
That seems weird to me. I'm using the standard arms that came with the rostock , and I haven't modified the firmware or anything.
//############## Delta Convex/Concave adjustments ######################
//Use this value to adjust your sweeping motion of the platform. If your nozzle is raising in the center, raise this value by .5 at a time, if it's lowering in the center
// lower it by .5 at a time until it sweeps across the table nice and flat
#define PRINTER_RADIUS 198.25
That's what my configuration file says. The only problem is that I can't upload anything to the rambo board. I posted the error message on the previous page, but I won't be able to print anything large until I get this figured out.
Also, does anyone who melted their PEEK barrel happen to know what temperature it melted at? Wikipedia says 343 degrees Celsius, but I want to be safe with it. Would running at the hotend at ~280 degrees for better nylon bonding mess up my hotend?
Check out the Tri hotend!
Re: Default Rostock
Generic Default wrote:That seems weird to me. I'm using the standard arms that came with the rostock , and I haven't modified the firmware or anything.
//############## Delta Convex/Concave adjustments ######################
//Use this value to adjust your sweeping motion of the platform. If your nozzle is raising in the center, raise this value by .5 at a time, if it's lowering in the center
// lower it by .5 at a time until it sweeps across the table nice and flat
#define PRINTER_RADIUS 198.25
That's what my configuration file says. The only problem is that I can't upload anything to the rambo board. I posted the error message on the previous page, but I won't be able to print anything large until I get this figured out.
Also, does anyone who melted their PEEK barrel happen to know what temperature it melted at? Wikipedia says 343 degrees Celsius, but I want to be safe with it. Would running at the hotend at ~280 degrees for better nylon bonding mess up my hotend?
anything above 240 you risk melting and or damaging your peek hotend. peek material used in hot end design has a lower melting point due to design..
My rostock build log http://forum.seemecnc.com/viewtopic.php?f=42&t=1228

Re: Default Rostock
My peek melted and destroyed itself at or around the 245-250ish mark very rapidly.
Do not go that high for any reason whatsoever.
Do not go that high for any reason whatsoever.
"Now you see why evil will always triumph! Because good is dumb." - Spaceballs
-
Polygonhell
- ULTIMATE 3D JEDI
- Posts: 2417
- Joined: Mon Mar 26, 2012 1:44 pm
- Location: Redmond WA
Re: Default Rostock
Are you trying to use Marlin or Repetier?
The reason for adjusting Delta_radius or one of the contributing values is that builds aren't perfect, we're talking about a change of probably <1mm.
The reason for adjusting Delta_radius or one of the contributing values is that builds aren't perfect, we're talking about a change of probably <1mm.
Printer blog http://3dprinterhell.blogspot.com/
-
Eaglezsoar

- ULTIMATE 3D JEDI
- Posts: 7159
- Joined: Sun Apr 01, 2012 5:26 pm
Re: Default Rostock
About the timeout you are getting when trying to use Arduino.
Do you have the printer turned off, the USB cable connected from the computer?
To read about other users on this forum having problems with timeouts go to Google and enter:
site:forum.seemecnc.com arduino timeout
Google will then search this forum for all occurrences for Arduino timeouts.
Do you have the printer turned off, the USB cable connected from the computer?
To read about other users on this forum having problems with timeouts go to Google and enter:
site:forum.seemecnc.com arduino timeout
Google will then search this forum for all occurrences for Arduino timeouts.
“ Do Not Regret Growing Older. It is a Privilege Denied to Many. ”
-
Generic Default
- Printmaster!
- Posts: 554
- Joined: Mon Jun 03, 2013 6:56 pm
- Contact:
Re: Default Rostock
Thanks for warning me about the PEEK melting above 240! Isn't 240 kind of the standard temperature to extrude ABS and nylon at though? I'll definitely be getting a full metal hot end in the next few months....
I'm using Repetier host and the firmware that came with the printer, which I think is Repetier, right? I still have the uploading problem. I tried every single version of arduino from 0023 to 1.05, and none of them can upload without the timeout error. I searched the forums like you said and found about 4 different threads that mentioned this problem, but none of them had any solutions.
When I have the printer turned off, arduino can't find COM9 so it won't upload at all. So I tried uploading with the printer turned on and it gives me that timeout error. The assembly manual doesn't mention any of this; it just says if I get an error I should talk about it on these forums.
WITH PRINTER ON:
avrdude: stk500v2_ReceiveMessage(): timeout
avrdude: stk500v2_ReceiveMessage(): timeout
avrdude: stk500v2_ReceiveMessage(): timeout
avrdude: stk500v2_ReceiveMessage(): timeout
avrdude: stk500v2_ReceiveMessage(): timeout
avrdude: stk500v2_ReceiveMessage(): timeout
avrdude: stk500v2_getsync(): timeout communicating with programmer
WITH PRINTER OFF:
processing.app.SerialNotFoundException: Serial port 'COM9' not found. Did you select the right one from the Tools > Serial Port menu?
at processing.app.Serial.<init>(Serial.java:191)
at processing.app.Serial.<init>(Serial.java:77)
at processing.app.debug.Uploader.flushSerialBuffer(Uploader.java:77)
at processing.app.debug.AvrdudeUploader.uploadViaBootloader(AvrdudeUploader.java:175)
at processing.app.debug.AvrdudeUploader.uploadUsingPreferences(AvrdudeUploader.java:67)
at processing.app.Sketch.upload(Sketch.java:1671)
at processing.app.Sketch.exportApplet(Sketch.java:1627)
at processing.app.Sketch.exportApplet(Sketch.java:1599)
at processing.app.Editor$DefaultExportHandler.run(Editor.java:2380)
at java.lang.Thread.run(Thread.java:619)
I'm using the right board Arduino Mega 2560 or Mega ADK
I'm using the right port COM9
I'm using the programmer AVRISP mkII
I'm using Arduino 1.05, the newest version
Can anybody give me an extremely detailed process for how to upload the firmware, with details like the version of arduino, printer off/on, exact steps to follow to upload successfully?
Thanks!
Check out the Tri hotend!

Re: Default Rostock
Is this what you were referring to about not being able to change the EEProm?Generic Default wrote:Thanks for helping me through this guys. I just spent the last 3 hours un-crimping, crimp-fixing, and re-crimping every single bad crimp I made. So now they're correctly done and all four motors are spinning smoothly and quietly.
I also just extruded my first 10mm of nylon! Which is a big relief after 6 days of building and fixing.
Everything seems to be working fine, except all three axises are inverted and I can't seem to change it by uploading the firmware with the inverted stuff. In arduino, there are the tabs at the top for all of the files that get opened when I open the Repetier.ino file. I changed the invert part from true to false, but when I compiled and uploaded, it didn't change anything. Arduino prints this at the bottom after I compile and upload;
Binary sketch size: 101,612 bytes (of a 258,048 byte maximum)
avrdude: stk500v2_ReceiveMessage(): timeout
avrdude: stk500v2_ReceiveMessage(): timeout
avrdude: stk500v2_ReceiveMessage(): timeout
avrdude: stk500v2_ReceiveMessage(): timeout
avrdude: stk500v2_ReceiveMessage(): timeout
avrdude: stk500v2_ReceiveMessage(): timeout
avrdude: stk500v2_getsync(): timeout communicating with programmer
If so, this appears to be a baud rate issue. Try slowing it down - to 115200 or even slower.
Technologist, Maker, Willing to question conventional logic
http://dropc.am/p/KhiI1a
http://dropc.am/p/KhiI1a
-
Generic Default
- Printmaster!
- Posts: 554
- Joined: Mon Jun 03, 2013 6:56 pm
- Contact:
Re: Default Rostock
I just set the baud rate to 57600 in the device manager and in repetier host. It didn't change anything. Is there some way to set the baud rate in arduino?
EDIT:
More bad news for me. After I changed the baud rate, I can't communicate with the rambo anymore through repetier host. I changed it back to what I had before, but it isn't working. IS there any way I can just completely reset the rambo board?
EDIT:
More bad news for me. After I changed the baud rate, I can't communicate with the rambo anymore through repetier host. I changed it back to what I had before, but it isn't working. IS there any way I can just completely reset the rambo board?
Check out the Tri hotend!
-
Polygonhell
- ULTIMATE 3D JEDI
- Posts: 2417
- Joined: Mon Mar 26, 2012 1:44 pm
- Location: Redmond WA
Re: Default Rostock
When you are programming the arduino you are talking to the ISP and not the arduino directly, the baud rate is almost certainly 19200 for the ISP, usually baud rate selection is take care of by selecting the appropriate board in the arduino drop down.
It's possible you have a board with a bad ISP, on the RAMBO board there is a second uController that's used for this purpose, and it is only used when programming the board.
It's possible you have a board with a bad ISP, on the RAMBO board there is a second uController that's used for this purpose, and it is only used when programming the board.
Printer blog http://3dprinterhell.blogspot.com/